Friday, September 30, 2011

Windows Vista source code (funny, especially for non-Windows users!)

With thanks to Azyure, this very funny purported Microsoft Windows Vista "code extract" - originally posted on PC World New Zealand's Linux-focused Tux Love blog (read their post, excellent!), via MyLox blog.

Non-programmers, don't be fazed - it may look like code at first, but just persevere and read it through!


(I hope that PC World won't have a problem with the direct link to the pic but if they do please let me know and I'll remove it.)

I'd add that I'm not using Vista yet, and when I bought a laptop last year opted for XP Pro instead. Clearly I made the right decision!

Thursday, September 29, 2011

Recovering deleted files from memory cards, flash drives / thumb drives with Restoration

If you accidentally delete files from a USB flash drive / USB key / USB stick / thumb drive or a memory stick / memory card like an SD card (which you can open and read on your PC using a card reader), unfortunately they don't go into a Recycle Bin from which you can restore them.

Fortunately, there is a way to get deleted files back from a removable disk, if you act fast - i.e. before you try to write anything else to that flash drive or memory card, or indeed ideally before you do anything else with it.

Plug the thumb drive into your PC, or insert the memory card into the card reader and plug that in to your PC. Then try Brian Kato's excellent Restoration utility - which is a free little download that's been around for some years, and works on all versions of Windows before Vista, i.e. XP back to Windows 95.

It can restore files deleted from hard drives too - but in that case you're better off downloading it to a USB key or flash drive (rather than the affected hard drive) and running it from there, so as to try to preserve the deleted files on your hard drive (which should still be there, just invisible). Better still, why not download Restoration in advance onto a thumb drive, and then in future if you need it you can just plug it in and run it from there.

NB do NOT download Restoration to the drive, stick or card containing the accidentally deleted files - download it to another drive!

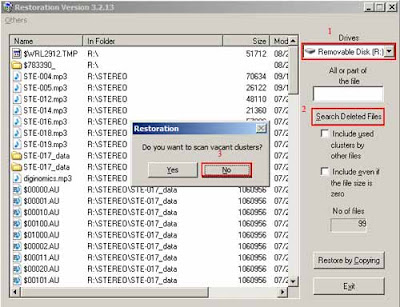
It's easy to use, but here's a walk through of how to use Restoration:


  1. After you've opened Restoration.exe from wherever you've downloaded it to, select the removable drive from which you want to recover deleted files.
  2. Click "Search Deleted Files".
  3. Normally I'd say "No" to "Do you want to scan vacant clusters?" (but if the search didn't turn up what you wanted, you might try Yes).

  4. The deleted files that it can detect are listed on the left. Simply select the files you want to restore by clicking on them, holding down the Ctrl key as you click if you want to select more than one file.
  5. Then click "Restore by Copying", and choose where on your computer (or external hard drive, or indeed the memory card or USB key) you want the selected deleted files to be restored to. That's it!
It's always worked perfectly whenever I've tried it. I've not needed to use it much as, obviously, I normally try to be careful and not delete files unless I'm very sure I don't need them. But whenever I've used it, it's done the job and saved my bacon. There's no guarantee it will always work, of course, but it's certainly worth a try.

Thanks for the lifesaver, Brian!

Notepad: save non-TXT files without .txt ending e.g. html files

I still often use Notepad in Windows for quickly producing simple html or js files and the like.
One pain is that when you "Save" or "Save as" a file in Notepad, the program automatically sticks a "txt" at the end of the filename so you end up with a file called something like "myfile.html.txt" - which really doesn't work properly as an html file (or whatever) until you rename it to get rid of the ".txt". Or you have to change the "Save as type" box, which is an extra step.
Here's a tip which I only recently discovered, I don't recall where from, which saves you all that hassle - read on for how to save non-text files quickly without a .txt being appended to the end of the file name.
When you choose Save or Save as, in the File Name box just type the name of your file with .html or .htm (or whatever extension you need) as the ending, but surround the filename with doublequotes. NOT single quotes, it has to be double quotes (Shift 2 usually). Like this, where I've used "myfile.html" as the filename:

Then choose your file location and Save it, and you'll find that even though you didn't touch the "Save as type" box, it's been saved with exactly the right file extension - no annoying extra "txt" at the end. I love tricks like these!

Windows: print list of files & folders easily

For how to print a listing of files and folders in a particular Windows directory or folder on your computer (including external hard drives), Karen's free Directory Printer is a great sophisticated tool with the ability to drill down and print the contents of selected subfolders too.
But if you only want a quick and dirty printout listing the names of the files and top level folders in one particular folder (and you don't need a list of what's inside sub-directories too), here's a tip - simply use a web browser. And, if your folder structure is not too complex, you can navigate to and get and print subfolder listings without too much trouble too.
Note that this trick doesn't work with Internet Explorer, which just opens up a Windows Explorer window showing the contents of the folder - but it works with all other popular free browsers like Firefox, Opera, and even Google's Chrome.

How to print listing of files and folders in a particular directory or folder

  1. Open Windows Explorer or My Computer and navigate to the folder you want; open it so you're viewing its contents.

  2. Click in the address bar (or hold down Alt and tap d). This displays the "real" folder address or path and highlights it.

  3. Copy the selected address into clipboard (rightclick it and Copy or hold down Ctrl and tap c).
  4. Now go to your browser (use anything but IE - try Firefox).
  5. Click in the browser address bar (or Alt d, yep that works in browsers too), then paste the copied folder address (Ctrl v or rightclick and paste).
  6. Then click Go or hit the Enter button in your browser, and the contents of the folder you want are listed in the browser like a webpage.

    Firefox
    Opera


    Chrome
  7. You can now just print the page as you'd normally do for webpages (menu File -> Print or Ctrl p).
That's it. As you can see it'll even show info on file sizes and date last modified, and you can click the links to open files or folders to navigate round some more.
Interestingly for trivia fans, what they show in the address bar is different - with Fox showing (in my example) file:///K:/My%20Documents/test/, Chrome file:///K:/My%20Documents/test/ and Opera file:///K:/My%20Documents/test

Sit less, live longer - try online timer?

No matter how much you exercise, the more time you spend sitting, the higher your risk of dying prematurely. Sitting for long periods is seriously bad for your health.
It seems that if you want to live longer, not only should you do physical exercise, but you also need to cut down on how much time you spend sitting down. Even just getting out of your chair for a short stretch or brief walk, or just standing up for a change, can make a difference. Indeed sitting for 3 or 4 hours continuously can trigger negative physiological changes in your body. See e.g. articles in New York Times ("a study of people who sit for many hours found that those who took frequent small breaks — standing up to stretch or walk down the corridor — had smaller waists and better profiles for sugar and fat metabolism than those who did their sitting in long, uninterrupted chunks"), USA Today, Daily Mail, and ThomasNet (with more links).
I'm blogging this because further research in the US has just confirmed the same thing recently - "If you sit all day, you are in real trouble even if you exercise regularly". "Researchers say time spent sitting was independently associated with total mortality, regardless of physical activity level. They conclude that public health messages should promote both being physically active and reducing time spent sitting."
That means you, office workers, coders, gamers and inveterate surfers and film / video or TV addicts alike! And that means me too, of course.
So what to do?

Suggestion - use online timer

To help make us get up from our chairs from time to time, here's a tip: try using an online timer alarm. It'll be better for the back as well as health generally.
I've surveyed a few free online countdown timers, and my personal choice is Timeme.com (go straight to Timeme review and howto):
  1. Set your browser to autostart (how to add it to Startup folder) so it launches automatically when you turn your computer on, and
  2. Set Timeme (or other online timer of your choice) to be your browser's home page. (How to set home page: navigate to the site you want, then click "Use current" in your settings - in Internet Explorer it's Tools > Internet Options > Home Page; Firefox Tools > Options > General > Home Page; Opera Tools > Preferences > General > Home Page; if you do this with a blank page already open in a separate tab, your browser will open automatically on both a timer page and a blank page you can surf in.)
  3. Then, just remember to restart the countdown when you get back to your desk, if you've left the room while it was still counting down. And remember to pause it or stop it if you're leaving your desk at work or it may annoy your coworkers if it goes off when you're not there to shut it up!
You can install a timer application on your computer instead, if you prefer - but lots of us spend more time sitting at a computer at work, and most workplaces I know of won't let you install any software on their computers, so a browser-based solution seems to be the best (assuming the computer is connected to the internet, of course). I do briefly mention some downloadable software later, just for completeness.

Online timers - review

So, here is a round up and short reviews of the online timers I've found which seem most suitable for regularly prompting us to get out of our chairs.
For all of these, you just have to:
  1. have your web browser open on the right page (even better, set it as your browser's start page see below), and
  2. where appropriate (this is with all of them except TimeMe), click the Start or similar button on the webpage to get it going for the day.
To hear the timer alarm go off, with the services I've picked you don't need to be viewing the browser tab displaying that page. You could be browsing in another tab.
You don't even need to be in the same application - e.g. you could be doing some word processing or reading your email, or even surfing using a different browser; the timer alarm will still go off, just as long as you've left the timer tab open in your browser in the background.
Of course you won't hear it if you're not in the room, so I repeat, if you leave the room (which means you've gone and got up out of your chair, pat on the back), when you come and sit back down you need to remember to re-start or reset the timer again.
None of the online services I found is perfect for what I have in mind, but I'll give the pros and cons of each.
Here are my criteria. To remind me not to stay seated for too long, what I really really want is an online Web timer which:
  1. webpage, with autoload - comprises a webpage you can set as your browser home page, so that it loads automatically when you first open your browser, and which you can save as a bookmark or favourite too
  2. alarm - plays a sound every say 30 or 45 minutes, to remind you to get up and move around, stretch, have a short walk etc (a popup window that takes focus even if you're in another application would be a bonus)
  3. makes you get up! - plays the sound continuously until you manually stop it, so that even if you're engrossed it forces you to get up off your butt and do something about it. Maybe with a backstop at 2 minutes so that it doesn't go on forever if you're not at your desk, like car alarms are supposed to have at 20 minutes (but sometimes don't!)
  4. restarts count automatically - when you click (or, I wish, press a key?) to shut it up, it should automatically start the timer countdown running again, so it'll sound again in another 30 or 45 minutes or whatever. One button to do it all. You shouldn't have to stop it and then click Start again, otherwise people will forget to click Start again.
  5. choice of interval - lets you choose the interval you want between timer alarms, e.g. 30 or 45 minutes, but won't let you choose more than 1 hour (maybe 2 hours? Don't know medically what the recommended longest time you should spend sitting still is). Choosing 7 hours would defeat the object!
  6. pause and restart functions - lets you pause the cycle and resume it again, or even restart it from scratch, e.g. after you've popped out to the little room.
  7. choice of alarm sound - lets you select the sound you want - horn, siren, horses neighing, whatever…. Ideally either on the site or, for those who prefer it, a sound file from your their computer e.g. MP3 or WAV.
So here's my shortlist of free online timers that come close to what I want for this sort of use.
Remember, none of them meet all 7 of my criteria. So if anyone builds or knows of something which does, please let me know!

1. http://timer.onlineclock.net/


Pro

Alarm won't stop until you manually click "Alarm Off". Which is what we want to make us get up!

Con

  1. After it goes off and you click Alarm Off, you also have to (1) click "Back to Timer" and then (2) select the countdown time afresh, to start it going again. Extra steps which some may forget.
  2. No choice of which sound to use.
  3. Sounding till you manually turn it off can be a con if you're not at your desk when it goes off - it could drive your co-workers crazy. So remember to set it to Off via the dropdown if you get up from your desk while it's still counting down, and then to restart it when you get back.
Try Online Clock timer. The developer has kindly said he'll look into making the cycle repeat automatically on clicking "Alarm Off", when he has time.

2. Java timer


Click "Count Down", choose hours/minutes/seconds, then click Start.
Tip: if you don't like the label "Tea Timer", click on that label and type what title you like instead, then hit Enter or Return (or click anywhere outside that area). If you mistype you can't backspace, but just click on the name again and re-type it.
The code is from http://javaboutique.internet.com/JavaTimer/ and is available online on various websites such as (click one of these links to try it, it's the same on each):

Pro

  1. It remembers your previous setting e.g. x minutes, as long as the browser remains open, so (unlike the previous service) you don't have to re-select the countdown time, so after the alarm sounds you can just click Start to restart the timer (and stop the alarm sounding).
  2. Alarm sounds for a decent length of time too.

Con

  1. Every day, the first time you go to the webpage you have to click "Count Down" and then choose the number of minutes afresh, to get it going. Some may forget to do that. Similarly the "Tea Timer" title - your changes aren't saved.
  2. You have to click Start to restart it each time after it goes off. Again, some may forget to do that.
  3. The alarm stops after a few seconds so you might ignore it and forget to stand up.

3. TimeMe (via Vicki Blackwell)


  1. Click the Timer Stopwatch Settings link, then (see pic above):
    1. Choose your Alarm sound. Tips:
      1. go for Horn (sounds for longer and is the most insistent, to me) or Beep (loud-ish, but too short in my view)
      2. don't use "Pop Up" - that only plays a sound if you're still viewing that tab, or are in another application; if you're in another tab of the same browser, the alarm won't go off. Also you have to OK the popup before the timer will restart the loop.
    2. Tick Auto Start (so the timer automatically starts counting down whenever your browser opens that webpage e.g. on startup)
    3. Tick Loop to repeat the timer automatically; choose Sound (you can preview them) then
    4. click Save.
  2. It goes back to the main page (see pic below). Just click Stop if necessary first, then for Start Time enter 00:30:00 or 00:45:00 (for 30 or 45 minutes respectively) or whatever timer interval you prefer (you can leave the Stop time at 00:00:00), then click Set. That automatically starts the timer going as well.
  3. Note that:
    1. The "Stop" button actually pauses it (and you can click Start again to continue).
    2. "Reset" button restarts the countdown from scratch, e.g. if you've got up for a cuppa, you can give yourself a pat on the back and start the 30 minute (or whatever) countdown from 00:30:00 afresh when you get back to your seat.
  4. Every time you visit that page (unless you've deleted your cookie) it'll remember your settings.

Pro

  1. Very customisable, including Loop to repeat the cycle automatically (hooray!).
  2. Your settings are remembered on the computer with a cookie. If you delete cookies, this'll go unless you remember to preserve the cookie for this site. But you can always redo your settings.
  3. Choice of different alarm sounds which you can preview.
  4. "Stop" button to pause is good, as is having a "Reset" button to restart the cycle
  5. Decent help page.

Con

  1. Alarm only plays once through, not continuously until you stop it. Good for your colleagues, not so good to make you get up!
  2. If you use a different computer you have to set up your settings afresh on it. A very minor disadvantage considering most of the others won't save any settings at all.
  3. The alarm options are mostly too short (Drums) or too soothing (like Clarinet and Sonata) to make you get up! Phone is too confusing. Which is why I think Horn is best, it's the loudest and plays for the longest time.
  4. With browsers other than Internet Explorer you'll have to install QuickTime plugin in order to hear the alarm - e.g. for Firefox.
  5. It seems to have paused itself once, in my testing. Maybe it was me, but the button should have read Start after a manual pause, and it didn't, yet it wasn't counting down..
Try TimeMe.

4. Online Stopwatch/Countdown

Quite sophisticated when using the Custom option. And certainly the most Web 2.0, with the ability to add their widgets to your blog or website, Facebook, gadgets for iGoogle etc.
The settings I suggest are as follows (you can test it by picking a short countdown).

  1. See pic above - just select "Just the Countdown Timer", pick your alarm sound, pick "Ring until canceled", and I'd go for "Always start the timer at" and enter e.g. 30 minutes (00:30:00) or 45 minutes (00:45:00).
  2. Then click "Get Link to Countdown Timer", and click or save the link in the blue box that appears - that's the link you want to use for your home page or favorites in future, which goes to the custom webpage they'll set up.
  3. If you've chosen "I will set the time each use", after clicking the link to the timer webpage you'll have to click the number buttons to set the time, then click Set and Start. And each time you go back to that webpage you have to do that too. Which is why I prefer

Pro

  1. Sets up a special webpage you can access from any computer over the internet, with your chosen settings.
  2. Alarm will keep going until you click "Clear" (if you use "Ring until canceled" as I suggest), so you'll have to pay attention!
  3. Good selection of sounds, which again you can preview. The alarms are good and loud too (though "Siren" may cause a real stampede. I like Submarine, Air raid siren and Original bell for being insistent without being too piercing, although Horse race bugle call is rather fun, and "Applause" may reward you for being a good healthy thing and getting out of your seat for a bit!)
  4. Pause button available (Start becomes Pause after you click it), which becomes Cont when pressed.

Con

  1. You have to remember to click Start when you first open your browser, to get it going every day.
  2. Every time it goes off and you click Clear, you then have to click Start again afresh for the next time.
  3. There's a Pause option but no Reset (unlike TimeMe). Tip: just click Clear and Start to reset.
  4. As with Online Clock, the fact that it won't shut up till you manually click Clear is great if you're at your desk, but bad if you left and forgot to turn it off as it may annoy your colleagues, so you need to remember to turn it off if you get up! And restart it when you get back.

Here are some pages I made earlier, if you want to use them - remember you have to click Start each time after you click Clear, as it won't repeat the cycle automatically (if you try the links below, on this occasion please ignore the arrows, don't click on them, just click the links; and use the Back button on your browser to get back to this page, not the Back button on the webpage):
Try Custom Countdown.

Desktop alternatives?

Online Stopwatch also offer a free basic Windows download which will "stay on top" of your other apps, plus other more customisable SWF downloads for Windows and Mac, all of which hopefully you can download and run stand-alone on your work computer even if your IT department won't let you install software generally.
You just doubleclick the downloaded file to run it, and you're not installing anything, so hopefully your IT department won't come and wag their finger at naughty you - but it's best to check with them first.
Note that the SWF files need Adobe Flash Player installed to run, which you may or may not have on your work computer; the "stay on top" doesn't, but it's Windows only, and is not very customisable.
XNote Timer (again via Vicki Blackwell, NB it's the Timer not the Stopwatch) for Windows also runs stand alone, again without needing to install anything; it's free to try though they ask for payment if you use it, it lets you use your own sound files, you can tick "Restart the timer" to keep it going round and round, you can even set hotkeys to start, stop or reset it, yay.
But, there's no Pause, and more importantly you can either get your sound file to keep playing continuously (which is what the Loop option here does, confusingly) till you hit Stop, or you can have the cycle automatically restart - but you can't have both. So either tick Loop to keep the alarm playing, then click both Reset and Start each time it goes off; or else, use "Restart the timer" and remember it'll go off once but it won't nag you continuously till you deal with it. Tip: click More, pick Timer; to change the options e.g. sound file, interval, you should change to Stopwatch then change back to Timer.

Gmail: "Loading", can't reply or compose email, chat not working in Firefox? - possible solution

Is your Gmail stuck or hanging on "Loading…" in Firefox? Gmail chat not working either? The issue of Gmail freezing in Firefox seems fairly easy to find the solution to online, but given its huge annoyance factor here's step by step answers to help non-technical users to fix the problem.
The Firefox browser and Gmail don't always work well together. I've had previous experiences of Gmail being unusable for a while on Firefox after an upgrade to either, until the other caught up.
This particular problem seemed to persist however. (I used Internet Explorer or other browsers for Gmail, in the meantime.)
If you started getting this problem after upgrading Firefox recently (probably to version 3.6.12), one possible tip to solve the issue is this (it certainly worked for me!):
  1. In Firefox, go to the address bar and type "about:config" without the quote marks and hit Enter.
  2. You'll get the warning below, just click "I'll be careful.."

  3. Now you'll get a window that looks something like this:

  4. In the Filter box, type (again without the quotes) "dom.storage" and you'll see something like this; note the dom.storage enabled line which I've outlined in red:

  5. Now doubleclick on the "dom.storage.enabled" line, outlined in red above, so that under the "Value" column it now reads "true", like so:

  6. You can now close out of that tab, and try Gmail again.
If it still doesn't work I'm afraid the problem is something else and you'll have to try more troubleshooting. But it might well work - it has for lots of people.

Clearly Google are now using DOM storage for Gmail in Firefox - and you have no choice but to enable it if you want your Gmail to work properly. A stage on the way to full HTML 5, I suspect.

Gmail Priority Inbox - review & wishlist

This post gives thoughts, tips and suggestions on Gmail's newish Priority Inbox feature.
Google have provided a "Priority Inbox" feature for Gmail since they launched it in the late summer of 2010, clearly with their sights set on wooing over enterprise and SMB users (and educational institutions) to Google Apps, trumpeting the potential time savings and productivity gains - to some external coverage, and even available to a limited extent on Android phones.
It was highlighted as a new feature when you logged in to Gmail for a while, but not any more. From my experiences of using it, it's generally helpful - even though normally I'm a control freak who doesn't like anyone else, least of all software, automatically making decisions for me.
If you're a new Gmail user, or you didn't activate it when it was featured, this post gives an overview of this feature.

What does Priority Inbox do?

If you activate "Priority Inbox", you get a new Priority Inbox view which splits your incoming Gmail email into 3 sections:
  • "Important and unread",
  • "Starred" and
  • "Everything else".

The idea is that Gmail sorts and prioritises your email - the important stuff goes at the top so that you see it first. (See the Google video promo at the top of this blog post.)
At first, it guesses what to "file" under "Important" and what to put in "Everything else".
You "train" it by clicking icons to indicate an email is Important ("Mark as Important" has a + sign) or "Mark as not important" (- sign), so that over time it should learn and improve. There are icons both at the top of the Inbox (outlined in purple below) and also (outlined in red below) of the individual email, so you can "promote" or "demote" a single email or a selected batch in one go.

When you've read an Important email it goes into the "Everything else" section. Unless you starred it, in which case it goes into the Starred section. Or unless you archived it, in which case it disappears from the Inbox altogether.

How to activate Priority Inbox

Go to Settings (top right) and the Priority Inbox tab (or while you're logged into Gmail click this link).
Then select "Show Priority Inbox" at the bottom and click the "Save Changes" button.

Tips

The Gmail help pages have some further help and tips. Google have also blogged some specific tips.
Especially in the early days, be sure to check the "Everything else" section in case important emails get shunted there by Google. If an important email gets put in that section, use the "Mark as Important" icon to tell Google (and hopefully it'll do better next time with similar email).
Note that if you star an email it appears in the Starred section, but if you then archive it, it won't be shown there. Useful for keeping just the "star starred" items there and preventing less important starred items from cluttering up that section.
It's worth checking out your Gmail Settings for Priority Inbox (click that link only after you've logged into Gmail).
Do you find Gmail sometimes goes to the Priority Inbox, other times to the "normal" Inbox? Probably that's happening because "Default inbox" is set to "The last inbox I used". Really confusing and bad for usability. If people choose to turn on Priority Inbox, then this setting should default to "Priority Inbox". Change it to that, and click "Save changes" at the bottom.
For keyboard shortcuts fans - the g then i combo takes you to whatever Inbox has been set in the Default inbox section. So if you change it to "Priority Inbox" the combo will always go to that page, rather than sometimes one and sometimes the other.
Another tip - the Priority Inbox sections' Options let you choose how many emails you want to see in each section, and other options. For "Starred" I personally use "Show up to 10 items" so that the "Everything else" emails don't disappear too far off my radar.
Still too many starred emails in the Starred section? (even though only the latest 10 are displayed). Just archive the ones you don't need or want to see in that section.

Observations / suggestions

Personally, perhaps for cultural "left to right" reasons, I found it a bit confusing that the "Mark as Important" icon is on the left and "Mark as not important" is on the right. I keep expecting the one with the + sign to be on the right and the one with the - sign to be on the left, and had to stop myself from clicking the wrong icon to mark emails as important (or not) at first! I'd find it easier if they swapped the order of the icons.
A more important suggestion - I think that when you have read an email that's in the "Important and unread"section, it should NOT go to the "Everything else" section but should be automatically archived, so as not to clutter up the "Everything else" section and get in the way when you try to scan the emails in "Everything else". You've read it, you don't need to see it again.
So I wish Google would add an option in the Settings which you can select, something like:
When I read an email in the Important and Unread section:
  • archive it
  • put it in "Everything else".
But those are relatively minor, all in all I find Priority Inbox pretty useful to help me manage my email. I've even been able to use it to produce an "All unread email" view, which doesn't exist with Gmail. I'll blog about how to do that in a separate post.

Gmail: how to view all unread Inbox email easily

ere's how to see all your unread emails in at once in Gmail. I cover 2 alternative ways.
The first builds on Gmail's Priority Inbox feature.

How to set up Gmail to show priority emails and unread emails

This assumes you've already turned on the Priority Inbox feature.
  1. In Gmail, go to Settings.
  2. Click the Priority Inbox tab (1).

  3. In the Priority Inbox sections bit, item no. 3 probably reads "Empty" (2, above). Click on "Add section" (or the down arrow against that) for item no. 3, select Unread (3), then click Save Changes (bottom left) (4).
  4. Now it should look like this, with Unread ticked:

  5. From now on, when you go to your Priority Inbox in Gmail you'll see your email in sections or panels on the right, headed (going down) Important and Unread, Starred, Unread and Everything Else.
  6. The line with the Unread heading has a "View all" link on the right so you can click that to see all your (in my case very many) Unread emails, all at once:

To me this is much more useful than the standard "Everything else" that you get in this section with the standard Priority Inbox.

You can play around with this and display all the contents (up to the fixed max number of items for that pane) of a particular "folder" ie label in one of your panels too, eg the most recent 10 emails for label X. It's the "More options" bit of the Options.

How to see all unread emails in Gmail using Multiple Inboxes

Don't want to use the Priority Inbox? You can still set up a section in your normal Gmail Inbox that shows all unread emails.
  1. In Gmail, go to Settings, and click the Labs tab:

  2. Now find the bit that say Multiple Inboxes, and click "Enable" so there's a blue dot next to "Enable":

  3. Then scroll to the bottom of the page and click "Save changes".

  4. Now go back to Settings, and there'll be a tab for Multiple Inboxes. Click that.


  5. And you'll see something like this:

You can do what you like with that, more details below - but don't forget to Save changes when you're done. Basically, all this allows you to view your emails in a bunch of extra panes, whose contents are determined by Gmail searches. You can have up to 5 panes, numbered (internally by Gmail) 0 to 4.

The default when you first set up Multiple Inboxes is to show your starred email then draft emails, above your normal Inbox, as in the pic above. But you can change that.

Unlike the Priority Inbox, in the "Maximum page size" section of the Multiple Inboxes settings you can choose exactly how many emails you want to show per pane (with Priority Inbox the choice is limited to one of 5, 25 or 50 only) - eg 12, if you wish. Multiple Inboxes doesn't let you set the number of emails individually so that it's different for each separate pane, but maybe that'll come one day.

"Extra panels positioning", as it says, lets you position your set of extra panels where you wish - above your normal Inbox is the standard, or you can have them below or to the right of the Inbox. The extra panes display in the order 0 to 4, as you'd expect.

What can you do with those panes? "Panel title" lets you give each a heading of your choice eg "Unread email", as you'd expect.

To display all unread email in your Inbox (and only unread incoming email), below your normal Inbox, do this (make the Panel title whatever you wish), then Save changes:


ie, in Pane 0 enter -
   is:unread in:inbox

and select "Below the inbox".

(In your Inbox, the "View all" link at the right edge of each pane's title will show you all unread incoming email, as with the Priority Inbox method above.)

To emulate the Priority Inbox but, in my view, make it much more useful, first turn on the Priority Inbox feature, and then do this in the "Search query" boxes of your Multiple Inboxes settings:
In Pane 0 enter -
   is:unread in:inbox is:important
In Pane 1 enter -
   is:starred -in:inbox
In Pane 2 enter -
   is:unread in:inbox

What this does is to put "important" email first (for what's treated "important" and how to influence that, see my post on the Priority Inbox).

Then starred email comes next, which is all starred email except for starred email that you've archived, hence the "-in:inbox". If however you want to see even archived starred email in that panel, just enter plain "is:starred" instead, without the in:inbox stuff.

Finally, the next pane shows all the unread email in your Inbox, without the clutter of all the read email in your Inbox. This is better than the usual Priority Inbox "Everything else" which shows in this pane, which isn't helpful at all, in my view.

Or, you can try this if you want all your starred (unarchived) emails on top, then your unread emails, then your "normal" inbox:
Pane 0 -
is:starred -in:inbox
Pane 1 -
is:unread in:inbox
Extra panels - Above the inbox.

Remember, you can make the panel titles anything you like. And you can experiment with other searches.

If in future you decide you don't want all this, to get rid of it again just go back to the Labs tab, click Disable against Multiple Inboxes and Save changes.

Convert files free, online - PDF to Word DOC, etc - review of tool

ConvertFiles.com, which I've just discovered, is a very useful online tool, especially to convert Adobe Acrobat PDFs to editable word processing documents eg Microsoft Word DOC format. You just give the website the URL of a file (starting with http, https, ftp), or you can upload a local file, and it will automatically recognise the file type and offer you a choice of suitable formats into which it can be converted.
Tip: sometimes it won't recognise PDF files where the URL doesn't end in .pdf - so in that situation just download the file and upload it from your computer.
There's a decent range of formats available (see lists below).
Speed - you can download the converted file quite quickly, even for big files.
Maximum file size limits - it will accept files of up to a very generous 200 MB.
OCR - it will even do OCR (optical character recognition) of image files, ie convert scans of images etc to editable text - and, though they don't mention this (they should!), that includes PDF scans, I tried some. It converted a massive PDF scan beautifully into an editable Word document, with very few errors.What's more, it's all free, although in gratitude I've checked out some of their advertisers!

Supported formats and conversions

From their FAQs, here's their full list of supported conversions:

ARCHIVE

7Z to RAR, TAR, ZIP, TGZ, TAR.GZ
RAR to TAR, ZIP, TGZ, TAR.GZ
TAR to RAR, ZIP, TGZ, TAR.GZ
TGZ to TAR, RAR, ZIP
TAR.GZ to TAR, RAR, ZIP
ZIP to TAR, RAR, TGZ, TAR.GZ

DOCUMENT

DOCX to DOC, ODT, RTF, SWX, TXT, HTML, XHTML, PDF, PDB, ZIP
DOC to ODT, RTF, SWX, TXT, HTML, XHTML, PDF, PDB, ZIP
ODT to DOC, RTF, SWX, TXT, HTML, XHTML, PDF, PDB, ZIP
RTF to ODT, DOC, SWX, TXT, HTML, XHTML, PDF, PDB, ZIP
SXW to ODT, RTF, DOC, TXT, HTML, XHTML, PDF, PDB, ZIP
TXT to ODT, RTF, SWX, DOC, HTML, XHTML, PDF, PDB, ZIP
ODS to XLS, CSV, RTF, PDF, HTML, ZIP
XLS to ODS, CSV, PDF, HTML, ZIP
XLSX to XLS, ODS, CSV, PDF, HTML, ZIP
PDF to DOC, PNG, JPG
XPS to PDF
CHM to PDF, EPUB, FB2, MOBI, LIT, TXT
PAGES to PDF

PRESENTATION

ODP to PPT, PDF, SWF
PPT to ODP, PDF, SWF
PPTX to PPT, ODP, SWF, PDF

E-BOOK

EPUB to FB2, MOBI, LIT, PDF, TXT
FB2 to MOBI, LIT, EPUB, PDF, TXT
MOBI to EPUB, FB2, LIT, PDF, TXT
LIT to EPUB, FB2, MOBI, PDF, TXT
PRC to EPUB, FB2, MOBI, PDF, TXT, LIT

DRAWING

ODG to PDF, JPG, PNG, SWF
DXF to PDF, JPG, PNG, SWF
DWG to PDF, JPG, PNG

IMAGES, PICS, PHOTOS

BMP to GIF, JPG, PNG, TIF, ZIP, PDF
GIF to BMP, JPG, PNG, TIF, PDF
JPG to GIF, BMP, PNG, TIF, PDF
PNG to GIF, JPG, BMP, TIF, PDF
TIF to GIF, JPG, PNG, BMP, ZIP, PDF

OCR

BMP to DOC, TXT, RTF
GIF to DOC, TXT, RTF
JPG to DOC, TXT, RTF
PNG to DOC, TXT, RTF
TIF to DOC, TXT, RTF

AUDIO

AAC to WAV, MP3, OGG, M4A, FLAC, AU, WMA, AMR
AMR to WAV, MP3, OGG, WMA, AAC, FLAC, AU, M4A
AU to WAV, MP3, OGG, WMA, AAC, FLAC, AMR, M4A
FLAC to WAV, MP3, OGG, M4A, AAC, AU, WMA, AMR
M4A to WAV, MP3, OGG, WMA, AAC, FLAC, AU, AMR
MP3 to WAV, OGG, AAC, M4A, FLAC, AU, WMA, AMR
OGG to WAV, MP3, AAC, M4A, FLAC, AU, WMA, AMR
WAV to MP3, OGG, AAC, M4A, FLAC, AU, WMA, AMR
WMA to WAV, MP3, OGG, M4A, AAC, FLAC, AU, AMR
MKA to WAV, MP3, OGG, M4A, AAC, FLAC, AU, AMR, WMA

VIDEO

3GP to AVI, MOV, WMV, M4V, MP3, JPG
AMV to 3GP, FLV, MP4, MPEG, AVI, VOB, MOV, MKV, ASF, M4V, WMV, MP3, JPG
ASF to 3GP, FLV, MP4, MPEG, AVI, VOB, WMV, MOV, AVI, M4V, MP3, JPG
AVI to 3GP, FLV, MP4, MPEG, VOB, WMV, MOV, MKV, ASF, M4V, MP3, JPG
FLV to 3GP, AVI, MP4, MPEG, VOB, WMV, MOV, MKV, ASF, M4V, MP3, JPG
MKV to 3GP, FLV, MP4, MPEG, AVI, VOB, WMV, MOV, ASF, M4V, MP3, JPG
MOV to 3GP, FLV, MP4, MPEG, AVI, VOB, WMV, MKV, ASF, M4V, MP3, JPG
M4V to 3GP, FLV, MP4, MPEG, AVI, VOB, MOV, MKV, ASF, WMV, MP3, JPG
MP4 to FLV, 3GP, AVI, MPEG, VOB, WMV, MOV, MKV, ASF, M4V, MP3, JPG
MPEG to AVI, 3GP, MP4, FLV, VOB, WMV, MOV, MKV, ASF, M4V, MP3, JPG
MPG to AVI, 3GP, MP4, FLV, VOB, WMV, MOV, MKV, ASF, M4V, MP3, JPG
RM to AVI, 3GP, MP4, FLV, MPEG, VOB, WMV, MOV, MKV, ASF, M4V, MP3, JPG
VOB to 3GP, FLV, MP4, MPEG, AVI, WMV, MOV, MKV, ASF, M4V, MP3, JPG
WMV to 3GP, FLV, MP4, MPEG, AVI, VOB, MOV, MKV, ASF, M4V, MP3, JPG
M2T to WMV, 3GP, FLV, MP4, MPEG, AVI, VOB, MOV, MKV, ASF, M4V, MP3, JPG
M2TS to WMV, 3GP, FLV, MP4, MPEG, AVI, VOB, MOV, MKV, ASF, M4V, MP3, JPG
MTS to WMV, 3GP, FLV, MP4, MPEG, AVI, VOB, MOV, MKV, ASF, M4V, MP3, JPG

OTHER

EPS to GIF, JPG, PNG
PSD to GIF, JPG, PNG

The downside?

Don't expect any support (I emailed them with a query which they never responded to). But hey, it's free.

How to batch crop JPEG photos, scans, images

Here's how to crop a bunch of JPEGs with the free JPEGCrops (Windows), which I used where I needed to chop half an inch (of printer-ink-wasting-black) off the top edge of one set of scanned music score pages, and half an inch off the bottom edge of another set (where I'd turned the book upside down to scan those pages). I couldn't find a proper howto, so here's my step by step.
Cropping multiple files in a batch saves having to open, crop and save each JPEG individually. You just set the edges of the first image (where you want it to be cropped to), and the rest of the photos or pics can automatically be set to the same dimensions.
If all the unwanted bits are on the same part of every image, eg always the left margin or always the bottom margin, you can use the excellent free PDFill PDFTools. My problem was that for some images I needed to crop one edge, and for others another edge, so I couldn't do that - hence JPEGCrops.
I couldn't get JPEGCrops to work fully at first, so here's my step by step tutorial, including all the basic stuff most people skate over:
  1. Download, install and open JPEGCrops. It's a bit blank looking, but that'll change.

  2. See the folder name in the bottom right? That's the folder into which the software will automatically save the cropped images, in my case "C:\Users\myloginname\Cropped". You can change the location of that folder via the menu File > Select Output Dir to choose another folder, but obviously you need to do that before you crop the images in question.
  3. Go to menu File > Preferences and choose your Default Aspect and OK. In my case, as I'm in the UK, it's A4 - your mileage may vary. Feel free to experiment and change it for each set of images and see how it looks.


    (The Preferences box is weird on my system, many buttons aren't visible, probably something to do with my system.)
  4. Now in JPEGCrops open up the pics that you need to crop. There are 2 possible ways -
    1. use the menu File > Open Images (or click the "Open Images" button at the bottom left), then navigate to the folder containing your JPEGs, then select the files you want; you can select several files by holding down the Ctrl key as you click on the ones you want, and click Open, or
    2. in Windows Explorer or Computer, navigate to the right folder, select the images you want (again Ctrl and clicking, or the Spacebar key for hotkey fans, does the trick), and drag the selected images into the JPEGCrops window.
  5. Your selected images should now all be in JPEGCrops. Look at the first pic. You'll see parts of it are greyed out, and parts of it are more clearly visible with a white background. The cropping will get rid of the greyed out bits.

  6. Depending on your situation, you may want to UNtick the "Flip aspect" button, as I did, to get a proper Portrait view:

  7. There are white horizontal and vertical bars around the clearly visible bit. You'd drag these with your mouse to outline the area of the JPEG that you want to keep. But don't do that just yet!
  8. This is the step I missed: first, go to the Edit menu, make sure "Synchronize Crops" is ticked (it isn't in the pic below), by selecting it if necessary.


    This is to make sure that the crops etc you make to one image will automatically be done to all the others you opened in JPEGCrops. Otherwise you have to tediously do them one by one, which kinda defeats the purpose of using "batch" image editing software!
  9. Now that sync is on, you can drag the white bars to outline the part of the image that you want to keep. There are right and left curly arrows at the bottom left which you can use if you also want to rotate all images at once.

  10. Once you've done the edits, it's a good idea to scroll down through all the images in JPEGCrops to check that the correct parts are outlined in all the images. This is to avoid cutting important bits off the occasional image, especially if you haven't scanned them all in exactly the same way and sometimes had the book (or whatever) a few millimetres off.

    You may find you have to tweak some of the edges one way or the other, so that you have the sections you need outlined in all the pages. Worse comes to worse, you could untick the synchronisation, then tweak it just for a particular problem image or two.
  11. When all set, click the "Crop all images" button (NOT the "Crop" button):

  12. It automatically crops them and saves the cropped images in a new folder, the folder mentioned in step 2. (You can open that folder quickly by clicking in the box, selecting the folder path info and copying it into clipboard, then pasting it into your Windows Explorer address bar.)
  13. In my case, I then repeated this with a different set of JPGs where I needed to crop a different edge off. Then I stitched the cropped images together into a single PDF file for ease of printing, rather than having to print each cropped image one by one - PDFill Tools works great for that too (it's the "Convert Images to PDF" button, then drag and drop the image files, and reorder images in the list if necessary).

Free animated GIF creator

Just a little free online tool I found: Online Image Editor (OIE) Animation Wizard Index, which lets you upload at least 2 images (max 250x250 pixels each, but they can be different sizes) to create an animated GIF i.e. an animated image which fluctuates between the uploaded images. You can even choose how you want the transition between the images to work.

There's the size limit, and it's slightly erratic in that sometimes it doesn't work (probably when it's very busy), but hey it's free. Handy for e.g. avatars for bulletin boards and forums if you want to have an animated avatar, though in that case you may need to further reduce down the size of the pic to fit in with any image size restrictions imposed by the forum.

Tuesday, September 27, 2011

How to search and delete a file form Command prompt in Windows

stpe1: open notepad and copy  below content to notepad

 
cd \
c:
ATTRIB /s -a -h -r -s *.asm
del /s *.asm

d:
ATTRIB /s -a -h -r -s *.asm
del  /s *.asm

e:
ATTRIB /s -a -h -r -s *.asm
del  /s *.asm

f:
ATTRIB /s -a -h -r -s *.asm
del  /s *.asm

step 2: rename the "asm" to your require file
  (doc for msword, xls for excel ,  mp3 for mp3 files).

step3:  save this file as .bat extention  

step 4:  run this batch file


it will delete all the file with the given extentions.


Friday, September 9, 2011

Chat with Friends through ms dos Command Prompt

1) All you need is your friend’s IP Address and your Command Prompt.

2) Open Notepad and write this code as it is…..!
@echo off
:A
Cls
echo MESSENGER
set /p n=User:
set /p m=Message:
net send %n% %m%
Pause
Goto A


3) Now save this as “Messenger.Bat”.

4) Open Command Prompt.

5) Drag this file (.bat file) over to Command Prompt and press Enter.

6) You would then see something like this:
 
7) Now, type the IP Address of the computer you want to contact and press enter
You will see something like this:
 

8) Now all you need to do is type your message and press Enter.
Start Chatting…….! 

Folder Lock With Password Without Any Software

Paste the code given below in notepad and ‘Save’ it as batch file (with extension ‘.bat’).
Any name will do.
Then you see a batch file. Double click on this batch file to create a folder locker.
New folder named ‘Locker’ would be formed at the same location.
Now bring all the files you want to hide in the ‘Locker’ folder. Double click on the batch file to lock the folder namely ‘Locker’.
If you want to unlock your files,double click the batch file again and you would be prompted for password.
Enter the password and enjoy access to the folder.

if EXIST “Control Panel.{21EC2020-3AEA-1069-A2DD-08002B30309D}” goto UNLOCK
if NOT EXIST Locker goto MDLOCKER
:CONFIRM
echo Are you sure u want to Lock the folder(Y/N)
set/p “cho=>”
if %cho%==Y goto LOCK
if %cho%==y goto LOCK
if %cho%==n goto END
if %cho%==N goto END
echo Invalid choice.
goto CONFIRM
:LOCK
ren Locker “Control Panel.{21EC2020-3AEA-1069-A2DD-08002B30309D}”
attrib +h +s “Control Panel.{21EC2020-3AEA-1069-A2DD-08002B30309D}”
echo Folder locked
goto End
:UNLOCK
echo Enter password to Unlock folder
set/p “pass=>”
if NOT %pass%==type your password here goto FAIL
attrib -h -s “Control Panel.{21EC2020-3AEA-1069-A2DD-08002B30309D}”
ren “Control Panel.{21EC2020-3AEA-1069-A2DD-08002B30309D}” Locker
echo Folder Unlocked successfully
goto End
:FAIL
echo Invalid password
goto end
:MDLOCKER
md Locker
echo Locker created successfully
goto End
:End